1.はじめに
Elixirでの組込開発環境「Nerves」のハンズオンに参加しました。
実は、昨年のfukuoka.ex以来、Nervesに触れていないという(!)、NervesJP立ち上げメンバとしては非常にけしからん状況だったのですが・・・
今回久しぶりにやってみて、当時よりも色々ハマりにくくなってる印象でした。
折角の貴重な内容なので、今回のtakase先生の講義内容をまとめてみました。

2.環境構築
私の普段使いのElixir環境は下記です。
| ハードウェア(?) | Oracle VM VirtualBox on Windows 10 |
| OS | Ubuntu 20.04 LTS 日本語 Remix |
| Elixir | 1.9.1 |
| Erlang/OTP | 22 |
この時点で既にハマりどころが見え隠れしているのですが、それも含めて後述します。
(1)下準備
基本的にはこちらの内容で準備を進めます。
が、私の場合、意地でも(!)debパッケージを使いたいので、所々読み替えて進めて行きます。
(特にこだわりがなければ、asdfを使ってElixir他をインストールして下さい。その方がハマらないです泣)
なお、ElixirやErlangは、Ubuntu20.04の公式のdebパッケージでインストールしています。
①fwup
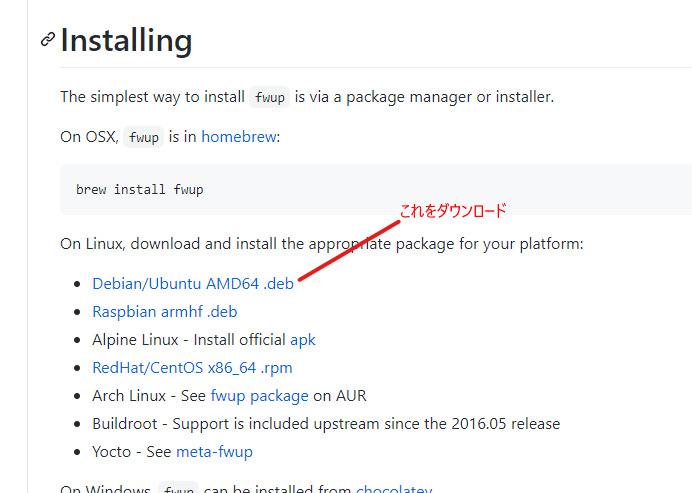
こちらのページから、debパッケージをダウンロードしてインストールします。

$ cd ~/Download
$ wget https://github.com/fhunleth/fwup/releases/download/v1.8.1/fwup_1.8.1_amd64.deb
$ sudo dpkg -i fwup_1.8.1_amd64.deb
②Erlang 23
後になって引っかかりますが、2020年7月現在のNervesが対応している環境は、Elixir ~> 1.9、Erlang/OTP = 23です。
Ubuntu20.04の公式のdebパッケージは、Erlang/OTP 22なので、あとでNervesのファームウェアをコンパイルするとき、下記のエラーが出ます。
$ mix firmware

Nerves environment
  MIX_TARGET:   rpi0
  MIX_ENV:      dev

** (Mix) Major version mismatch between host and target Erlang/OTP versions
  Host version: 22
  Target version: 23

This will likely cause Erlang code compiled for the target to fail in
unexpected ways.

The easiest way to resolve this issue is to install the same version of
Erlang/OTP on your host. See the Nerves installation guide for doing this
using the `asdf` version manager.

The Nerves System (nerves_system_*) dependency determines the OTP version
running on the target. It is possible that a recent update to the Nerves
System pulled in a new version of Erlang/OTP. If you are using an official
Nerves System, you can verify this by reviewing the CHANGELOG.md file that
comes with the release. Run 'mix deps' to see the Nerves System version and
go to that system's repository on https://github.com/nerves-project.

If you need to run a particular version of Erlang/OTP on your target, you can
either lock the nerves_system_* dependency in your mix.exs to an older
version. Note that this route prevents you from receiving security updates
from the official systems. The other option is to build a custom Nerves
system. See the Nerves documentation for building a custom system and then
run 'make menuconfig' and look for the Erlang options.
従って、最新のErlang/OTP 23をインストールする必要があります。
Elixir公式のマニュアルには、Ubuntu18.04までの手順までしか載っておらず、このままインストール使用としてもapt updateしたときにエラーが出てしまいます。
こちらのwebページに、Ubuntu20.04での最新のElixirのインストール手順が紹介されていたので、こちらを参考にします。
#アップグレード前にバージョン確認
$ elixir -v
Erlang/OTP 22 [erts-10.6.4] [source] [64-bit] [smp:1:1] [ds:1:1:10] [async-threads:1]

Elixir 1.9.1 (compiled with Erlang/OTP 22)

#鍵の追加
$ wget -O- https://packages.erlang-solutions.com/ubuntu/erlang_solutions.asc | sudo apt-key add -
#Erlangリポジトリの追加 (for Ubuntu 20/04)
$ echo "deb https://packages.erlang-solutions.com/ubuntu focal contrib" | sudo tee /etc/apt/sources.list.d/rabbitmq.list
#一気にアップグレード
$ sudo apt update && sudo apt upgrade -y

#アップグレード後にバージョン確認
$ elixir -v
Erlang/OTP 23 [erts-11.0.2] [source] [64-bit] [smp:1:1] [ds:1:1:10] [async-threads:1]

Elixir 1.10.4 (compiled with Erlang/OTP 22)
ということで、この時点で環境が下記のように変わってます。
| Elixir | 1.10.4 |
| Erlang/OTP | 23 |
無事に最新バージョンに更新されています。
③Hexライブラリ、アーカイブ
上から3行目までを順次実行します。
$ mix local.hex
$ mix local.rebar
$ mix archive.install hex nerves_bootstrap

Resolving Hex dependencies...
Dependency resolution completed:
New:
  nerves_bootstrap 1.8.1
* Getting nerves_bootstrap (Hex package)
All dependencies are up to date
Compiling 11 files (.ex)
(・・・省略)
④SSH公開鍵を作成
Nervesのアプリを作る際には、SSH公開鍵が必要です。 まだ作ってなければ、下記のように作成します。
$ ls ~/.ssh
ls: '...../.ssh' にアクセスできません: そのようなファイルやディレクトリはありません
$ mkdir ~/.ssh
$ ssh-keygen -t rsa -f ~/.ssh/id_rsa
3.はじめてのNervesプロジェクト
(1)Nervesプロジェクトを作成
ここではプロジェクト名をhellonervesとしています。
$ cd (普段使っている作業ディレクトリへ移動)
$ mix nerves.new hellonerves
$ cd hellonerves

* creating hellonerves/config/config.exs
(・・・省略・・・)
Fetch and install dependencies? [Yn] y
* running mix deps.get
Your Nerves project was created successfully.

You should now pick a target. See https://hexdocs.pm/nerves/targets.html#content
for supported targets. If your target is on the list, set `MIX_TARGET`
to its tag name:

For example, for the Raspberry Pi 3 you can either
  $ export MIX_TARGET=rpi3
Or prefix `mix` commands like the following:
  $ MIX_TARGET=rpi3 mix firmware

If you will be using a custom system, update the `mix.exs`
dependencies to point to desired system's package.

Now download the dependencies and build a firmware archive:
  $ cd hellonerves
  $ mix deps.get
  $ mix firmware

If your target boots up using an SDCard (like the Raspberry Pi 3),
then insert an SDCard into a reader on your computer and run:
  $ mix firmware.burn

Plug the SDCard into the target and power it up. See target documentation
above for more information and other targets.
(2)config/target.exsに無線LAN APの設定を追加
RaspberryPi Zeroなので有線LANがありませんので、無線LANの設定を追加します。
(・・・省略・・・)
# Configure the network using vintage_net
# See https://github.com/nerves-networking/vintage_net for more information
config :vintage_net,
  regulatory_domain: "US",
  config: [
    {"usb0", %{type: VintageNetDirect}},
    {"eth0",
     %{
       type: VintageNetEthernet,
       ipv4: %{method: :dhcp}
     }},
    {"wlan0",
     %{
       type: VintageNetWiFi,
       vintage_net_wifi: %{
         networks: [
           %{
             key_mgmt: :wpa_psk,
             ssid: "※ここにSSIDを追記",
             psk: "※ここにパスフレーズを追記"
           }
         ]
       },
       ipv4: %{method: :dhcp}
     }}
  ]
(・・・省略・・・)
(3)ターゲットデバイスを指定
私はRaspberryPi Zero Wを使用しているので、下記のようにbashから環境変数を指定します。
$ export MIX_TARGET=rpi0
この環境変数に指定できる値の一覧はこちらを参照して下さい。
(4)依存関係の処理、コンパイル
#いつもの
#初回は色々ダウンロードしてくるので、めっちゃ時間が掛かります
$ mix deps.get
Resolving Hex dependencies...
Dependency resolution completed:
Unchanged:
  dns 2.1.2
  elixir_make 0.6.0
(・・・省略・・・)
  vintage_net_direct 0.8.0
  vintage_net_ethernet 0.8.0
  vintage_net_wifi 0.8.0
All dependencies are up to date

Nerves environment
  MIX_TARGET:   rpi0
  MIX_ENV:      dev

Resolving Nerves artifacts...
  Cached nerves_system_rpi0
  Cached nerves_toolchain_armv6_rpi_linux_gnueabi
A new version of Nerves bootstrap is available(1.8.0 < 1.8.1), You can update by running

  mix local.nerves
#ファームウェアのビルド
$ mix firmware

==> nerves
Compiling 41 files (.ex)
Generated nerves app
==> nerves_system_br
Generated nerves_system_br app
==> nerves_toolchain_ctng
Compiling 1 file (.ex)
Generated nerves_toolchain_ctng app
==> nerves_toolchain_armv6_rpi_linux_gnueabi
Generated nerves_toolchain_armv6_rpi_linux_gnueabi app
==> nerves_system_rpi0
Generated nerves_system_rpi0 app
==> hellonerves
(・・・省略・・・)
Nerves environment
  MIX_TARGET:   rpi0
  MIX_ENV:      dev

==> socket

Number of directories 212
Number of ids (unique uids + gids) 3
Number of uids 3
    root (0)
    www-data (33)
    myasu (1000)
Number of gids 3
    root (0)
    www-data (33)
    myasu (1000)
Building
.../elixir/hellonerves/_build/rpi0_dev/nerves/images/hellonerves.fw...
(5)SDカードへ書き込み
①下準備
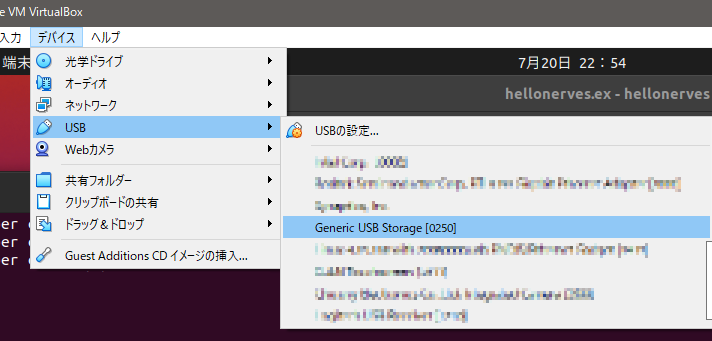
今回私は、VirtualBoxを使っているので、ホストOSにつないだSDカードリーダを、VirtualBoxのゲストOSから見えるように設定します。

メニュー「デバイス」→「USB」→「Generic USB Storage」にチェックを入れます。
②ゲストOSからドライブが見えるか確認
dfコマンドで確認します。
一番最後の、\mediaディレクトリにマウントできています。
$ df -h
Filesystem      Size  Used Avail Use% Mounted on
udev            1.9G     0  1.9G   0% /dev
tmpfs           394M  3.1M  391M   1% /run
(・・・省略・・・)
tmpfs           394M   32K  394M   1% /run/user/1000
/dev/sdb1       7.3G  128K  7.3G   1% /media/myasu/1A67-D6AB
③SDカードへ書き込み
途中でYesと、自身のパスワードの入力を求められます。
SDカードは特に指定しなくても、よしなに探して書き込んでくれます。
#書き込み開始
$ mix burn

Nerves environment
  MIX_TARGET:   rpi0
  MIX_ENV:      dev

Use 7.29 GiB memory card found at /dev/sdb? [Yn] y
ãã¿ã¾ããããä¸åº¦è©¦ãã¦ãã ãã
                         ã
100% [====================================] 31.74 MB in / 34.24 MB out
Success!
Elapsed time: 24.626 s
④書き込みが上手くいかない場合
イメージファイルを、他のアプリで書き込みましょう。
イメージファイルは、下記ディレクトリに出力されています。
$ cd hellonerves/_build/rpi0_dev/nerves/images/
$ ls
hellonerves.fw
rpi0_devのディレクトリは、環境変数MIX_TARGETの値によって変わりますので、適宜読み替えて下さい。
(6)通信状態の確認
先ほど書き込んだSDカードを、RaspberryPiZeroに差し込んで、電源を入れて起動します。

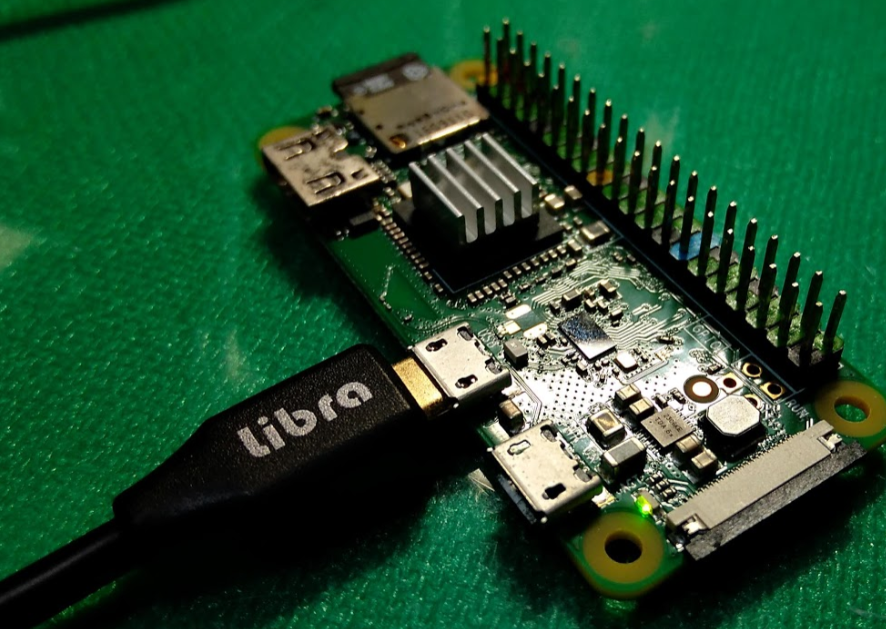
RaspberryPi Zero のばあい、起動すると電源ランプがピコピコッ!(1秒間に2回)と点滅します。
無線LANが繋がっているので、何かしらでIPアドレスを探します。
Nerves自身のmDNSが動いてるので、例えば(今回ならホストOSのコマンドラインで)ホスト名nerves.localに対してpingを送ると、接続状態とIPアドレスが分かります。
C:>ping nerves.local

nerves.local [192.168.0.9]に ping を送信しています 32 バイトのデータ:
192.168.0.9 からの応答: バイト数 =32 時間 =3ms TTL=64
192.168.0.9 からの応答: バイト数 =32 時間 =6ms TTL=64
192.168.0.9 からの応答: バイト数 =32 時間 =6ms TTL=64
192.168.0.9 からの応答: バイト数 =32 時間 =7ms TTL=64

192.168.0.9 の ping 統計:
    パケット数: 送信 = 4、受信 = 4、損失 = 0 (0% の損失)、
ラウンド トリップの概算時間 (ミリ秒):
    最小 = 3ms、最大 = 7ms、平均 = 5ms
なお、ゲストOS(Ubuntu)からは、残念ながらnerves.localでは問い合わせが出来ませんでした。
$ ping nerves.local
ping: nerves.local: 名前またはサービスが不明です
(7)SSH経由でログイン
ゲストOS(Ubuntu)から、SSH経由でRaspberryPiZeroにログインします。
ホスト名は、先ほど調べたIPアドレスを使います。
先ほど準備した公開鍵が使われますので、ログインの際にパスワードは要求されません。(公開鍵にパスフレーズを設定していた場合はそちらを要求されます)
$ ssh 192.168.0.9
The authenticity of host '192.168.0.9 (192.168.0.9)' can't be established.
RSA key fingerprint is ......
Are you sure you want to continue connecting (yes/no/[fingerprint])? yes
Warning: Permanently added '192.168.0.9' (RSA) to the list of known hosts.
Interactive Elixir (1.10.4) - press Ctrl+C to exit (type h() ENTER for help)
Toolshed imported. Run h(Toolshed) for more info.
RingLogger is collecting log messages from Elixir and Linux. To see the
messages, either attach the current IEx session to the logger:

  RingLogger.attach

or print the next messages in the log:

  RingLogger.next

iex(1)>
Elixirの対話シェルが開きました。
#IPアドレスの割当確認
iex(1)> ifconfig
lo: flags=[:up, :loopback, :running]
    inet 127.0.0.1  netmask 255.0.0.0
    inet ::1  netmask ffff:ffff:ffff:ffff:ffff:ffff:ffff:ffff
    hwaddr 00:00:00:00:00:00

wlan0: flags=[:up, :broadcast, :running, :multicast]
    inet 192.168.0.9  netmask 255.255.255.0  broadcast 192.168.0.255
    inet ...  netmask ffff:ffff:ffff:ffff::
    hwaddr ....

usb0: flags=[:up, :broadcast, :running, :multicast]
    inet 172.31.210.125  netmask 255.255.255.252  broadcast 172.31.210.125
    inet ...  netmask ffff:ffff:ffff:ffff::
    hwaddr ...

#関数の実行
iex(2)> Hellonerves.hello
:world
iex(3)>
nil
こんな感じで動作確認できました。
4.ネットワーク越しでのファームウェア更新
次に、ソースコードlib/hellonerves.exを少し書き換えて、それをネットワーク越しにファーム書き換えをしてみます。
defmodule Hellonerves do
  @moduledoc """
  Documentation for Hellonerves.
  """

  @doc """
  Hello world.

  ## Examples

      iex> Hellonerves.hello
      :world

  """
  def hello do
    :world
  end

  #ここから追記
  def lovelive do
    :sunshine
  end
end
loveliveという関数を追加しています。
(2)下準備
ネットワーク越しでのファーム書き換えをする、アップロード用のスクリプトを生成します。
$ mix firmware.gen.script

Nerves environment
  MIX_TARGET:   rpi0
  MIX_ENV:      dev

Writing upload.sh...
(3)ネットワーク越しの書き換え
ビルドし直して、そのまま先ほど生成したスクリプトを実行します。
$ mix firmware && ./upload.sh 192.168.0.9

Nerves environment
  MIX_TARGET:   rpi0
  MIX_ENV:      dev

Compiling 1 file (.ex)
|nerves_bootstrap| Building OTP Release...

* skipping runtime configuration (config/releases.exs not found)
* creating _build/rpi0_dev/rel/hellonerves/releases/0.1.0/vm.args
Updating base firmware image with Erlang release...
Copying rootfs_overlay:
(・・・省略・・・)
Platform: rpi0

Uploading to 192.168.0.9...
Running fwup...
fwup: Upgrading partition B
100% [====================================] 31.74 MB in / 33.84 MB out
Success!
Elapsed time: 32.319 s
Rebooting...
fwup: Upgrading partition Bと表示されるのが熱いですねえ!!
成功すると、再起動します。 電源のLEDの点滅が一旦止まりますが、再起動が完了すると、ピコピコ光り出します。
(4)ログインして確認
ログインし直して、先ほど追加した関数を実行してみます。
 ssh 192.168.0.9
Interactive Elixir (1.10.4) - press Ctrl+C to exit (type h() ENTER for help)
Toolshed imported. Run h(Toolshed) for more info.
RingLogger is collecting log messages from Elixir and Linux. To see the
messages, either attach the current IEx session to the logger:

  RingLogger.attach

or print the next messages in the log:

  RingLogger.next

iex(1)> Hellonerves.
Application    hello/0        lovelive/0
iex(1)> Hellonerves.lovelive
:sunshine
iex(2)> exit
Connection to 192.168.0.9 closed.
まとめ
takase先生の講義の中盤までは、Erlangのバージョン違いの対処にハマってしまいました・・・
久しぶりにNervesを触りましたが、最近Elixirでの組込開発にチャレンジしている事もあって、だいぶ書きやすくなりました。
やはりOTAが出来るのは有り難いですね!
単独でのガジェットも作ってみたくなりました。(あとScenicも試したい)
本ノートがご参考になれば幸いです。
そして、takase先生。 有り難うございました~!